Tuesday, September 29, 2009

The situation after Tobruk fell

Mussolini sent Marshal Cavallero to North Africa to provide support to Rommel's advance towards the Suez Canal. Field-Marshal Kesselring thought that the correct next move would be to capture Malta, but he realized the possibilities with an immediate advance into Egypt by Rommel's forces. By 26 June 1942, Rommel had moved forward to Sidi Barrani. Rommel intended to make Mersa Matruh his next objective. From there, he would move deeper into Egypt, where he hoped to reach Cairo by 30 June. One issue was that British forces had commenced offensive operations against Axis shipping from Malta. This is based on the account in Vol.III of the Official History.

Thursday, September 24, 2009

After Tobruk's capture

Mussolini's overriding concern was to capture Malta with the planned Operation Herkules. Mussolini had only authorized Rommel to advance to the Egyptian frontier, where he must wait until Malta was captured. Rommel would have none of it, however. He had an ally in Hitler, who was concerned that the capture of Malta could become a long and drawn out battle. Hitler asked Mussolini to reconsider and allow Rommel to advance into Egypt. Mussolini finally agreed with Hitler, as he coveted the Suez Canal. They decided to neutralize Malta rather than capture the island. This is based on the account in Vol.III of the Official History.

Sunday, September 20, 2009

The Fall of Tobruk


The Official History estimates that 33,000 men were taken prisoner at Tobruk, when the fortress was surrendered. The German casualties in the campaign to capture Tobruk were about 3,360 men killed. South Africa lost about one-third of their men in North Africa was prisoners. The German practice of officers leading in combat led to high casualties (perhaps as much as 70% in the motorized infantry and armoured units).


The main reason that the fortress fell was that a decision had been made as far back as February 1942 not to allow Tobruk to be besieged again. Because of that, the defenses were in poor condition. On top of that, the 2nd South African Division was not suited to defend the place, as the commander and men lacked the necessary experience.


With the surrender of Tobruk, Rommel was promoted to Field-Marshal. He expected to be able to blitz all the way to the Suez canal. This is based on the account in Vol.III of the Official History.

Tuesday, September 15, 2009

Tobruk falls

In the night of 20 June to 21 June 1942, there were discussions about either holding out, surrendering, or trying to break out from Tobruk. General Klopper sent General Ritchie a message that the mobile troops would attempt to break out before morning. Apparently, no breakout was attempted and a surrender was arranged in the morning. A few units held out for longer, such as the Gurkha Rifles and the Cameron Highlanders. Some troops did succeed in escaping, however. 199 officers and men from the Coldstream Guards and 188 other men broke out to the southwest and were escorted by South African armoured cars. A very few others escaped to arrive on the frontier, in one case, much later. The loss of Tobruk devastated Churchill. He was in Washington at the time of the surrender and took the news very hard. The loss resulted in a no-confidence motion in Parliament on 25 June. This is based on the account in Vol.III of the Official History.

Sunday, September 13, 2009

The attack on Tobruk, underway

The Italian 20th Corps was sent after the 15th Panzer Division, which had run into some British tanks, which had put up a good fight. The 21st Panzer Division came up, as well, and by 1:30pm, they had taken King's Cross, which was a high point. The harbour was hit by gunfire by 2pm. They had captured the town by 7pm and stopped the fight at 8pm, until morning. A series of missteps on General Klopper's part meant that an organized counter-attack never happened. Finally, a breakout was attempted in the night, as the situation had become untenable. By 6am on 21 June 1942, General Klopper had decided to surrender. This is based on the account in Vol.III of of the Official History.

Tuesday, September 08, 2009

The attack on Tobruk started on 20 June 1942

A small outpost had been kept outside of Tobruk at Acroma. These troops were withdrawn on 18 June 1942. A reconnaissance force of South African armoured cars and small columns continued to screen the defenses at Tobruk. Rommel had asked Field-Marshal Kesselring for a concentrated air attack at the time of the assault on Tobruk. Kesselring wanted to finish with Tobruk so they could concentrate on Malta, so he was a willing accomplice. The orders for the attack were given on 18 June. The attack would commence on 20 June. The Axis bombers began their attack at 5:20 in the morning. German troops moved forward to start the attack at 7am. Crossings were constructed over the tank ditch and the tanks moved forward at 7:45. The leading tanks of the 15th Panzer Division actually crossed the ditch at 8:30. They were followed by those of the 21st Panzer Division, which had been slowed by mines. This is based on the account in Vol.III of the Official History.

Saturday, September 05, 2009

Rommel's attack plans

Rommel intended to attack Tobruk on the southeast side, as he had in November 1941. The attackers comprised "the 21st Panzer Division on the right, the 'Menny' Group of the infantry of the 90th Light Division in the centre, and the 15th Panzer Division on the left." To their left would be the Italian 20th Corps, also a mechanized unit. Italian infantry from one 10th Corps division would follow the DAK and occupy territory as it was captured. The other division would surround El Adem. In the south lay the Italian Littorio armoured division. The bulk of the 90th Light Division and the reconnassance units would cause a distraction at the frontier. This is based on the account in Vol.III of the Official History.

Tuesday, September 01, 2009

Preparations at Tobruk in mid-June 1942

The South African Major-General Klopper, the 2nd South African Division commander, also commanded the defence of Tobruk. Brigadiers Willison and Johnson had made suggestions to Klopper, but he implemented none of them. General Gott had been in Tobruk, but General Ritchie ordered him to leave. The garrison awaited events on 20 June 1942, prepared to fight. General Auchinleck was becoming increasingly concerned by what he saw. He thought that the preparations in Tobruk were progressing too slowly. He also anticipate that the attack, when it came, would come from the east. All the records from 20 and 21 June were lost. The account of the battle on those days was built from personal accounts, as that was all the official history authors had available to them. The result of the battle was the capture of Tobruk and almost all of its defenders. This is based on the account in Vol.III of the Official History.

Saturday, August 29, 2009

Artillery at Tobruk in mid-June 1942

Tobruk was equipped with a rather meager supply of artillery in mid-June 1942. They already been stripped of 18 3.7in AA guns, which had been sent back to the Egyptian frontier. There were three field artillery regiments. The usual equipment of such a regiment was 24-25pdr gun-howitzers. There were also two medium regiments. Each was equipped with 8-4.5in guns and 8-155mm howitzers. The infantry units now had organic anti-tank artillery assigned. There were also two anti-tank batteries. The total count of anti-tank guns consisted of 15-6pdr anti-tank guns, 32-2pdr's, and 8-Bofors anti-tank guns. The anti-aircraft artillery was reduced to 18-3.7in AA guns and one regiment of light AA guns. This is based on the account in Vol.III of the Official History.

Monday, August 24, 2009

The fortifications at Tobruk in June 1942

Tobruk was originally captured by the 6th Australian Division in January 1941. The perimeter of the fortifications was essentially the same in June 1942 as they had been a year-and-a-half before. The fortifications had been improved with an inner ring that ran about two miles in from the outer perimeter. The two brigades of the 2nd South African Division were the primary defenders of Tobruk. They occupied defenses that were inferior to those of late 1941, as the anti-tank ditch was partially filled in and many mines had been removed for use elsewhere. The division did not have the experience and leadership of their predecessors. The other defending units included the 32nd Army Tank Brigade, the 201st Guards Brigade, and the 11th Indian Infantry Brigade. The army tank brigade was reduced to the 4th RTR with 35 Valentines and the 7th RTR with a mix of 26 Valentines and Matildas. The defenders had a few of the new 6pdr anti-tank guns among them. There was a mix of artillery units, as well. This is based on the account in Vol.III of the Official History.

Thursday, August 20, 2009

The 20 June 1942 assessment

On 20 June 1942, the commanders in the Middle East sent a message to the Chiefs of Staff in Britain that indicated that they had no idea that they were on the brink of Tobruk being overrun. They continued with their usual over-vonfidence that would soon be shattered. They listed the known reinforcements that were enroute to the Middle East and thought that Tobruk was well-defended and supplied. They thought that Tobruk should be able to hold out until relieved. The 8th Armoured Division was due to arrive in late June and the 44th Division was due to arrive in mid-July. Even if Tobruk was taken, surely, the Axis forces were in no shape to advance into Egypt. This is based on the account in Vol.III of the Official History.

Sunday, August 16, 2009

Tobruk loses air support

By 18 and 19 June 1942, the Desert Air Force had to withdraw all the way back to Sidi Barrani. They had been forced to withdraw from the Gambut fields and Sidi Azeiz could not be protected against fast-advancing Axis forces. What this meant was that Tobruk no longer had air support. One squadron of Kittyhawks with long range tanks could reach Tobruk, but that was the extent of what could be done. By early on 20 June, the German reconnaissance units had reached Sidi Azeiz. The Axis air forces spent 18 and 19 June readying for the big attack on Tobruk on 20 June. This is based on the account in Vol.III of the Official History.

Thursday, August 13, 2009

The British plan on 18 and 19 June 1942

General Auchinleck was now involved with developing plans to fight the advancing Axis forces that has enveloped Tobruk and pushed past towards the border. The plan by late 18 June 1942 was to use the 13th Corps, supplemented by the 7th Armoured Division, with the remnants of the 4th Armoured Brigade, the 7th Motor Brigade, and the 3rd Indian Motor Brigade, as a mobile force. The British were reduced to 66 tanks and had six columns of artillery and motorized infantry. The 1st South African and 50th Divisions provided one brigade each to be used to constitute three columns of mobile infantry and artillery. The rest of those divisions would be concentrated on the border, with the 10th Indian Division, to defend that area. They knew that there was a chance that Rommel would strike towards the border, but expected an attack on Tobruk as being more likely. This is based on the account in Vol.III of the Official History.

Tuesday, August 11, 2009

Tobruk surrounded: 18 June 1942

By early morning of 18 June 1942, Tobruk was surrounded by Axis forces. Axis control extended east about 40 miles. The DAK was situated on the east side of Tobruk, while the Ariete Division was southeast. The 10th Corps (Italian Pavia and Brescia infantry divisions)was on the south side. The 21st Corps (Sabratha and Trento divisions) was to the west, with some German infantry. General Ritchie reported to General Auchinleck, the theater commander, that he was not able to operate against the forces around Tobruk and still defend the frontier. At that, General Auchinleck flew out to the front to assess the situation. The result was that 13th Corps would protect the frontier, the 30th Corps would be withdrawn into reserve, and the army would directly command the forces in Tobruk. This is based on the account in Vol.III of the Official History.

Sunday, August 09, 2009

the 20th Indian Brigade tries to withdraw

As the 4th Armoured Brigade tried to disengage to the southeast, the 30th Corps commander, General Norrie, could see that Belhamed was about to be surrounded. He ordered the 20th Indian Brigade to break out and withdraw back to Sollum. Two battalions ran into German forces astride the road and were captured. The headquarters, another battalion, and the 97th Field Regiment succeeded in breaking out. Air Marshal Coningham heard that El Adem was in Axis hands and immediately ordered a withdrawal from Gambut. Fortunately, the Axis air forces were busy providing air cover to their advancing troops and so did not prevent the withdrawal. The fighters flew to Sidi Aziz while the day bombers flew back to fields near Mersa Matruh. This is based on the account in Vol.III of the Official History.

Wednesday, August 05, 2009

The 4th Armoured Brigade on 17 June 1942

The 4th Armoured Brigade, with composite regiments, had about 90 tanks, the 1st RHA, and the 1st King's Royal Rifle Corps. They had an encounter with the enemy near Sidi Rezegh and then spent the night about 10 miles to the southeast. Early on 17 June, the brigade was performing maintenance on their tanks and had dispatched two groups to support the 20th Indian Brigade. That had the unfortunate affect of dispersing the brigade's artillery regiment. In the afternoon of 17 June, the division commander, General Frank Messervy, had ordered the brigade to move to the Trigh Capuzzo, between Belhamed and El Adem. Before the 4th Armoured Brigade had moved to that position, the 15th and 21st Panzer Divisions drove into the brigade. The 9th Lancers were closet to the enemy and faced them to the north. The 3rd/5th RTR were to their southwest and were next to come in contact. The 1st/6th RTR was yet to engage, but only partially engaged due to a misunderstanding. The 4th Armoured Brigade was forced to withdraw southeastward. Brigadier Richards, the brigade commander, withdrew to a Field Maintenance Center to be in position to return to action in the morning. The brigade ended the day with 58 operable tanks. This is based on the account in Vol.III of the Official History.

Sunday, August 02, 2009

16 and 17 June 1942

The 20th Indian Brigade was holding key positions at Belhamed, with one of its four battalions at Sidi Rezegh. After an attack by the 21st Panzer Division late on 16 June, General Norrie considered withdrawing the brigade, but decided to hold on a little longer. While this was happening, the Desert Air Force at Gambut found itself exposed to attack, because they were only informed that El Adem had been abandoned twelve hours after the withdrawal. The air force was responding to requests for attacks from the 20th Indian Brigade. On 16 June, the 4th Armoured Brigade, now a scratch unit without its regular regiments, was near Sidi Rezegh, acting in support, with about 90 tanks. This is based on the account in Vol.III of the Official History.

Wednesday, July 29, 2009

The airfields at Gambut

On 15 June 1942, the Axis forces were getting very close to Gambut, where the Desert Air Force was based. Air Vice-Marshal Coningham decided to stay there with his aircraft, so that they could continue to support the forces defending El Adem. At Gambut, there was an armoured car screen from the No.2 Armoured Car Company, RAF. Behind the screen, Gambut was defended by "four infantry battalions and three and a half anti-aircraft batteries (ready to engage tanks if necessary)". Bostons attacked the "El Adem-Sidi Rezegh area" seven times. Fighter bombers attacked twenty times. The Germans had thought that they were taking 20mm cannon hits on their forces, but it was actually Hurricane IID's with 40mm guns. Some Bostons were attacked by Me-109s, but took no losses. The Kittyhawk escorts drove off most of the Me-109s. This is based on the account in Vol.III of the Official History.

Sunday, July 26, 2009

Air operations were intense on 15 June 1942

On 15 June 1942, the Desert Air Force was still able to operate from the airfields at Gambut. Gambut was just 30 to 35 miles east of Tobruk, so Boston's and fighter bombers had just a short hop to where the fighting was happening to the west. The fighters needed to provide escort to them as well as to the Vigorous convoy to Malta. The Germans had flown 193 sorties against the ship in the convoy on 14 and 15 June. That actually gave the 8th Army some relief, as the bombers that might have hit them were attacking the convoy, instead. The British had sufficient fighter strength so as to have intercepted them, anyway, if they had attacked the 8th Army formations. This is based on the account in Vol.III of the Official History.

Thursday, July 23, 2009

Withdrawal from El Adem

On 16 June 1652, General Norrie, 30th Corps commander, realized that El Adem could not be held much longer. He did not want to lose the 29th Indian Brigade, so he ordered the brigade to withdraw to the frontier. They were able to successfully withdraw early on 17 June. General Ritchie had been out of touch, so General Norrie made the decision with consultation with General Messervy. The withdrawal from El Adem left the Tobruk defenses without the southern end. That allowed the mobile Axis forces to turn the defenses. This is based on the account in Vol.III of the Official History.

Sunday, July 19, 2009

El Adem on 15 and 16 June 1942

The 29th Indian Brigade had two battalions holding El Adem and one battalion holding a position to the northwest. The 7th Motor Brigade was giving support to the Indian brigade. By 7:30pm on 15 June 1942, however, the 21st Panzer Division had taken the detached battalion at point B 650. By the morning of 16 June, the 30th Corps commander, General Norrie realized that he would not be able to effectively support the remaining two Indian battalions at El Adem and the force holding Belhamed, either. General Norrie told the 7th Armoured Division commander, Frank Messervy, that he expected that they would need to withdraw to the Egyptian frontier. General Ritchie was out of touch at this critical period. This is based on the account in Vol.III of the Official History.

Thursday, July 16, 2009

Axis plans

On 15 June, Rommel was told by the high command that they were going to withdraw air forces in late June and that he had to take Tobruk, because the current plan could not support an investment of Tobruk for a long period. The priority was to take Malta, because Malta was interfering with the supply route to North Africa. Rommel wanted to move east towards Egypt as fast as possible, so his thinking was not incompatible with the high command. The British response to Axis movements and possibilities was limited by the depleted forces that were available. That led General Ritchie to consider the use of "Jock Columns". General Auchinleck disapproved of them, because they were too weak to fight a serious battle and dispersed what forces were available. This is based on the account in Vol.III of the Official History.

Friday, July 10, 2009

14 and 15 June 1942

The "Vigorous" convoy was sailing to Malta on 14 June 1942, between the island of Crete and Cyrenaica. This diverted German aircraft that might otherwise have been bombing the retreating British forces. Some Bostons and Wellingtons bombed the airfields, including at Derna, on the night of 13/14 June to disrupt bombing of the convoy during the day. There were dust storms on 14 June that all but eliminated any air operations. Both British and Axis air operations were affected. The situation on 15 June was pretty grim for the British. Rommel calculated that he had won the battle and that what he was seeing was the disassembly of the British forces before Tobruk. The British tank forces were reduced to "one weak brigade of compositie regiments". Rommel's next objective was to take Tobruk. This is based on the account in Vol.III of the Official History.

Monday, July 06, 2009

Backup to the night of 13/14 June 1942

The 201st Guards Motor Brigade withdrew from Knightsbridge during the night of 13/14 June 1942. There were still some defended points that were resolutely held by Commonwealth and British small units. They were equipped with artillery as well as infantry. The remnants of the British armour were positioned to the "south and west of Acroma". Rommel tried to get his troops to cut the coast road, by that was beyond their capabilities at this time. The Axis forces succeeded in taking Pt. 187, but the 15th Panzer Division was held at bay while the 21st Panzer Division was eventually driven back at Eluet et Tama. By early on 14 June, the 1st South African Division and the 50th Division wre ordered to withdraw from Gazala towards the Egyptian frontier. The South Africans withdrew on the afternoon of 14 June, under cover of a dust storm. They left rearguard troops behind to slow the German advance. The 50th Division rearguard broke through to escape, but the South African's did not follow and were captured. Most of the 50th Division withdrew to the Egyptian frontier by 16 June, but some moved into Tobruk. This is based on the account in Vol.III of the Official History.

Wednesday, July 01, 2009

General Ritchie had no confidence that he could make Auchinleck's plan work


General Ritchie was concerned about the losses they would take if he ordered the Tobruk garrison to fight its way out to the east. He thought that the prospects were better to simply withdraw more forces into the Tobruk fortress and hold it under siege. The problem was that General Auchinleck was opposed to that course of action, although that was what Churchill expected them to do.


Churchill opposed abandoning Tobruk, as Auchinleck was prepared to do. He had seen the ability of troops in the fortress to resist assault and thought that they could do the same thing again. Auchinleck still wanted to hold a line west of Tobruk and fight there, outside of Tobruk. Auchinleck, in the face of questions from the Prime Minister accepted that Tobruk might be surrounded, if only temporarily. This is based on the account in Vol.III of the Official History.

Monday, June 29, 2009

More from 14 June 1942

By late in the day on 14 June 1942, General Ritchie, the 8th Army commander, had issued an instruction that his intentions were to withdraw to the Egyptian frontier. The 5th Indian and 10th Indian Divisions actually had orders to that effect. By 8:30pm, General Ritchie gave the 30th Corps commander guidance that they should not be caught in Tobruk and surrounded. They needed to protect the escarpment and cover the 13th Corps. General Ritchie was concerned that the exits from Tobruk might be blocked by Rommel's forces. When Churchill heard about the intentions that were issued, he told the commanders in the Middle East that he hoped that they did not intend to withdraw from Tobruk, leaving it to the Axis forces. This is based on the account in Vol.III of the Official History.

Thursday, June 25, 2009

A disconnect between commanders

General Ritchie asked if General Auchinleck would be willing to risk Tobruk becoming surrounded and under siege, in order to be able to not have to withdraw to the Egyptian border. This was on 14 June 1942. General Auchinleck had not been aware of just how desperate the situation near Tobruk had become. Auchinleck still believed that the Germans and Italians had suffered as well in the battle and could still be fought west of Tobruk. Auchinleck wanted to hold Tobruk, but did not want the fortress isolated and put under siege by the Axis forces. General Ritchie did not see this reply until 4pm on 14 June, after he returned to his headquarters after meeting with the corps commanders. Ritchie wanted to allow Tobruk to become besieged and told that to General Auchinleck. This is based on the account in Vol.III of the Official History.

Monday, June 22, 2009

14 June 1942: the British had lost the battle

Early in 1942, General Auchinleck had decided that he would not try to hold Tobruk while it was under siege, if such a situation arose. By late in the day on 13 June, 1942, General Ritchie realized that they had lost the battle on that day. Early on 14 June, he ordered a withdrawal to the Egyptian frontier. General Ritchie wanted to withdraw the divisions in the Gazala line before they were surrounded. With Tobruk not an option, he could only withdraw to Egypt. In previous battles, the British would have just withdrawn into Tobruk and setup to defend the fortress. General Ritchie telephoned headquarters and then sent a long dispatch in the early afternoon. He was directed to defend Tobruk, but to not allow his forces to be pinned there and put under siege. This is based on the account in Vol.III of the Official History.

Saturday, June 20, 2009

The abortive attack on Ploesti in June 1942

The Americans sent a group of B-24 Liberator bombers to Egypt in preparation for a raid on the oil fields at Ploesti, in Rumania. This group of bombers and their men was called the Halverson Detachment. A attack force flew from Fayid (close to the Suez Canal), taking off before dawn on 12 June 1942. The plan to form up and make a concentrated attack failed, and worse yet, the weather was cloudy when they arrived near Ploesti. They had planned a high level attack, so most bombers dropped their loads into the clouds. A few dropped below the clouds, but dropped their bombs without really aiming. The planes scattered after the attack. Four planes landed in neutral Turkey, two landed in Syria, and the rest landed in Iraq, as was the original plan. One British Liberator and the seven American planes participated in the "Vigorous" convoy action, which happened right after the attack on Ploesti. This is based on the account in Vol.III of the Official History.

Monday, June 15, 2009

Wellingtons in action in late May and early June 1942

Wellingtons, operating from airfields on Malta were active during late May and early June 1942. Malta was just starting to recover from the severe pounding and could not do much in North Africa. Wellingtons mostly operated against ports and airfields. No.205 Group flew 403 sorties from 26 May until 13 June. They mined the harbour at Benghazi (four times) and hit airfields at Tmimi, Martuba, Berka, and Derna.From 8 June, they hit Italian ports prior to the next two convoys to Malta. This is based on the account in Vol.III of the Official History.

Friday, June 12, 2009

Belhamed forward base had to be abandoned

A great deal of effort had been expended to extend the rail head to Belhammed, the forward supply base. The work was finished on 12 June 1942, as the situation near Gazala and Tobruk deteriorated. By 14 June, the order was given to removed from Belhamed. Most had been cleared by 16 June, as there was a plan in place that was executed. General Ritchie ordered the remaining petrol to be dumped on 16 June. Tobruk still had a large supply of stores, fuel, and ammunition. This is based on the account in Vol.III of the Official History.

Thursday, June 11, 2009

13 June 1942, a bad day for the British


On 13 June, Rommel planned to send the 15th Panzer Division west and the 21st Panzer Division east to "cut off Knightsbridge". He also ordered the 90th Light Division into the battle from near El Adem. In the morning, the 2nd Armoured Brigade and 22nd Armoured Brigade, with some infantry tanks from the 32nd Army Tank Brigade fought and resisted east of Knightsbridge. At 3pm in the afternoon, the attack by 21st Panzer Division on the 2nd Scots Guards, one battery of the 11th RHA, and the 6th South African Field Battery at the west end of Maabus er Rigel created a crisis. The 2nd Armoured Brigade and 4th Armoured Brigade were sent to help fight the 21st Panzer Division.


There were constant dust storms which greatly limited air action. In one case, some Kittyhawks attacked a Ju-88 formation that had a heavy escort. The result was four lost Kittyhawks.


At the end of 13 June, the British only had about fifty cruiser tanks and twenty infantry tanks remaining. They had lost possession of so much ground that there was no possibility of recovering and repairing lost tanks. As many as 417 tanks had been recovered up to this point. A full 210 had been repaired and another 122 were sent back to base workshops. Another 138 13th Corps infantry tanks were recovered during this period, as well. This left the British with little option but to withdraw from Knightsbridge, which General Gott ordered during the night of 13/14 June. This is based on the account in Vol.III of the Official History.

Thursday, June 04, 2009

The British plans for 13 June 1942

Late on 12 June 1942, General Ritchie believed that the battle would now center on the infantry divisions in the 13th Corps. He hoped to place the 1st Armoured Division under the command of 13th Corps to support them better. He was out of communication with General Lumsden, the 1st Armoured Division commander, however. General Ritchie was not able to pass orders to General Lumsden until the 13th. The British plan included the 7th Motor Brigade at El Adem to hit the Axis forces from behind. At El Adem, the 10th Indian Division was also supposed to engage the Axis forces. This is based on the account in Vol.III of the Official History.

Friday, May 29, 2009

General Ritchie starts to anticipate Rommel's moves

Later on 12 June 1942, General Ritchie learned of the British tank losses and he realized that Rommel might well decide to move north and pin the 1st South African Division and the 50th Division against the sea. General Ritchie thought that his only options were to continue the battle or withdraw to the Egyptian frontier. The latter would leave Tobruk cut off and vulnerable. General Ritchie decided that standing and fighting would be better than risking a running battle and withdrawal. General Auchinleck, who had come forward, agreed with his decision. Churchill learned of the situation and agreed that they should stand and fight. This is based on the account in Vol.III of the Official History.

Monday, May 25, 2009

12 June 1942 at Knightsbridge

British tactical communications seem to have been atrocious as the time of the Gazala battle. Conditions were hazy with a lot of dust in the air. The German anti-tank gunners used this as cover to push their guns forward. The deadly guns were the 50mm PAK38's, which had an extremely low-silhouette. They chewed up British armour on 12 June 1942, near Knightsbridge. General Lumsden, the 1st Armoured Division commander, was out of communication with his corps commander, General Norrie, so he was left to make his own decisions. General Lumsden knew that he had taken heavy losses and was in no place to go on the offensive. General Norrie, who had lost touch with the battle, still was thinking of offensive operations. General Lumsden decided to continue to hold Knightsbridge, inspite of his heavy losses. This is based on the account in Vol.III of the Official History.

Tuesday, May 19, 2009

The air battle on 11 and 12 June 1942

The British air forces saw the Axis movements north from Bir Hacheim later in the day on 11 June 1942. By the morning of 12 June, they knew that the 90th Light Division was near El Adem and commenced to attack them from the air, almost continuously. The 90th Light Division found these attacks to be non-effective and only a minor nuisance. There were about twenty low-level attacks by British aircraft during the day. The British had the air to themselves, however, on 12 June, as the Axis air forces were absent from the battle near El Adem. They were busy near Knightsbridge and Acroma. The biggest attack was a 100 plane raid at about 8pm which was intercepted by six British fighter squadrons. A huge air battle ensued. British fighters flew 583 sorties on the day. This is based on the account in Vol.III of the Official History.

Saturday, May 16, 2009

The Gazala Battle on 12 June 1942 turns against the British

The 30th Corps commander, General Norrie, decided to go on the offensive, early on 12 June 1942, since he believed that the Axis forces were dispersed. He wanted the 2nd and 4th Armoured Brigades to head south and then attack the 15th Panzer Division. The 7th Armoured Division commander, General Frank Messervy, disagreed with this move, and decided to go and talk with his corps commander in person. Near El Adem, he encountered Axis forces and was "out of touch with everyone". Since they never got the order to advance, the two armoured brigades sat and fought off a half-hearted attack by the 15th Panzer Division, which was supposed to keep a defensive posture. At noon, Rommel decided to hit the 2nd and 4th Armoured Brigades from front and rear with his two panzer divisions. Since General Norrie could not find General Messervy, he put the 7th Armoured Division brigades under the command of the 2nd Armoured Division commander, who brought forward the understrength 22nd Armoured Brigade. At this point, the 2nd and 4th Armoured Brigades were hit by the 15th Panzer Division. The 4th Armoured Brigade went over the escarpment, partly by mistake and partly because of the Axis attacks. The British had sustained heavy tank losses due to skillful use of anti-tank guns, which were pushed forward. General Norrie did not know about the losses that had been taken, and assumed that they armour was still intact. This is based on the account in Vol.III of the Official History.

Wednesday, May 13, 2009

The British tank situation on 12 June 1942

The British tank situation on 12 June 1942 was not as good as General Ritchie had believed, but they still had a fairly strong tank force:

Grants Stuarts Crusaders Infantry tanks
2nd Armoured Brigade 17 3 25

4th Armoured Brigade 39 56

22nd Armoured Brigade 27 5 34

32nd Army Tank Brigade 63

7th Motor Brigade 16
(detachment of the
2nd Royal Gloucestershire
Hussars)


The British had 83 Grants, 64 Stuarts, and 59 Crusaders, for a total of 206 cruiser tanks. They also had the 63 infantry tanks, mostly Valentines, but probably some Matildas, as well. There is a slight possibility that they could have had some A.10 Cruiser Mk.II, which had a similar speed to the Valentine. The 32nd Army Tank Brigade was the reconstituted 3rd Armoured Brigade, from early 1941. They definitely had some of the older A.9's and A.10's, if not A.13's in 1941. This list draws upon Note 1 from page 240 in Vol.III of the Official History.

Saturday, May 09, 2009

German armour on 11 June 1942

On 11 June 1942, the Axis tank strength was greatly reduced. There were 27 Pzkw IIIJ (or perhaps Pzkw IIIL), 6 Pzkw IVF2, 25 Pzkw II, 83 various models of Pzkw III, and 8 Pzkw IV tanks. There were also about 60 Italian M13/40 and M14/41 tanks. Rommel ordered the 15th Panzer Division, 90th Light Division, and Italian Trieste Motor Division to move towards El Adem. 21st Panzer Division was to show activity north from Sidra ridge. That led General Norrie to believe that he might have an opportunity to strike the Axis forces, which he thought were dispersed. This is based on the account in Vol.III of the Official History.

Tuesday, May 05, 2009

The British defences on 11 June 1942

A minefield stretched from Acroma to the sea and blocked the Axis forces to the west. Acroma, itself had its crossing held by the 2nd Scots Guards. The 29th Indian Infantry Brigade held El Adem. The 201st Guards Motor Brigade held Knightsbridge. The 2nd South African Division held the Tobruk fortress. The 1st South African and 50th Division defences at Gazala were still unbreached. The infantry defences were, therefore, relatively well positioned. The armour was in much worse shape, and to make matters worse, the strength was less than General Ritchie realized. The artillery was also greatly diminished. A full seven field artillery regiments had been lost in the battle to date. This is based on the account in Vol.III of the Official History.

Saturday, May 02, 2009

By 11 June 1942

As of 11 June 1942, the British defensive front at Gazala continued to hold, despite the Axis successes. The front was stabilized by the two divisions that were still intact: the 1st South African and the 5th Division. Besides that small units were spread across the desert in strong points with infantry, anti-tank guns, and field artillery. The anti-tank guns were in short supply, however. The infantry and especially the armour were becoming increasingly fractured. Because of the difficulties in resupplying units with tanks and soldiers, the armoured units had become mixtures composed from many different units. Worse, yet, while General Ritchie thought that on 10 June, he still had 250 cruiser tanks and 80 infantry tanks, he only had 77 Grants, 52 Crusaders, 56 Stuarts, and 63 infantry tanks. All the infantry tanks were in the 32nd Army Tank Brigade. This is based on the account in Vol.III of the Official History.

Monday, April 27, 2009

The 1st Free French Brigade Group

The 1st Free French Brigade Group were the defenders of Bir Hacheim. The brigade consisted of the following units:

2e bataillon Légion étrangère
3e bataillon Légion étrangère
2e bataillon de marche de l'Oubanghi
1er bataillon d'infanterie de marine (coloniale)
1er bataillon du Pacifique
1er regiment d'artillerie
1er bataillon de fusiliers marins (AA)
an anti-tank company, engineers, signal, medical,
signal, and administrative troops

They had 26 field guns, 62 anti-tank guns, and 44 mortars


This is from Footnote 1 on page 237 of the British Official History.

Thursday, April 23, 2009

Back to Bir Hacheim

While the Cauldron battle was being fought, the 90th Light Division and Italian Trieste division had been trying take Bir Hacheim in the south. They had good air support, although the support was very grudgingly given. Rommel had decided that Bir Hacheim needed to be taken by 8 June 1942 so that they could return to the task of attacking the Gazala line from the rear. To bolster the attack, Rommel sent the 15th Panzer Division south to join the battle. British columns operated outside the Bir Hacheim perimeter. They were formed from the 7th Motor Brigade, the 29th Indian Infantry Brigade, and the Free French. By 8 June, the air attacks had increased in intensity. 58 bombers escorted by 54 fighters were used in the attacks. The Free French needed help, but the army was not able to immediately help. Instead, the RAF mounted 478 sorties on 8 June against the Axis forces attacking Bir Hacheim. On 9 June, the British air effort was greatly diminshed. General Ritchie decided early on 10 June that the French needed to withdraw from Bir Hacheim,as they could not be sustained in that position. Rommel personally led a DAK attack that broke into Bir Hacheim from the north. The 7th Motor Brigade arrived with a large motor convoy and embarked 2700 men from the original 3600 and took them away successfully. This is based on the account in Vol.III of the Official History.

Sunday, April 19, 2009

Defeat in the Cauldron

The British attempt to destroy the Axis forces in the Cauldron was a failure. The Axis forces admired the "courage and self-sacrifice" of the British soldiers, but that was not enough to overcome the command problems that existed. Rommel seems to have been successful in allowing the British to attack and be defeated. The best of the British tactics, artillery concentration and infantry attacking at night, were not enough. Once the battle was underway, the British had lost control of the action while Rommel personally commanded the battle as it progressed. But the battle for the Cauldron was over and the focus would shift to Bir Hacheim. This is based on the account in Vol.III of the Official History.

Wednesday, April 15, 2009

The Hurricane IID arrives in the desert


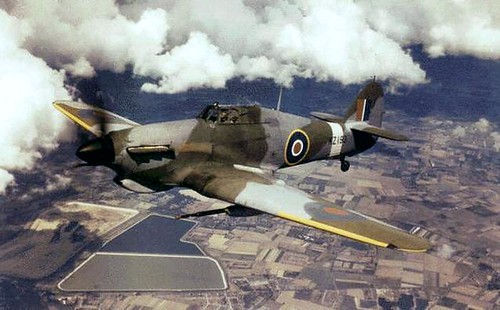
About this time, 6 June 1942, the first Hurricane IID aircraft arrived in the Desert. No.6 Squadron had nine when the squadron started operations. Their 40mm cannon seemed too large for the Hurricane. Because of the weight of the guns, the Hurricanes were stripped to reduce weight. With the guns, with 15 rounds each, they were still very overweight. Still, they could destroy Axis tanks with hits to the thin upper armour.

Sunday, April 12, 2009

"The Cauldron" lost on 6 June 1942

For some reason, the RAF was not able to effectively intervene in the battle for the Cauldron on 6 June 1942 when infantry and artillery was attacked by the Axis forces. The RAF frequently turned down requests for support during the day. This was at point B180, which was south-southwest of Knightsbridge. There were a Gurkha battalion and two Indian battalions, along with the 50th Reconnaissance Battalion and three RA Field Regiments and one RHA regiment. The Royal Artillery fought to the death, killed at their guns. A very few infantrymen escaped to the east. 7th Armoured Division was not able to intervene, despite having the 2nd and 4th Armoured Brigades. The usual problem occurred. Rommel knew what was happening, while the British commanders had lost touch with the the battle. They were not able to follow events as they happened. This is based on the account in Vol.III of the Official History.

Sunday, April 05, 2009

Chaos erupts: the divisional headquarters are overrun or dispersed

The Official History does a poor job of mentioning the date when events happen. Apparently, still on the afternoon of 5 June 1942, Rommel decided to go on the offensive with his mobile forces. The Ariete Division and the 21st Panzer Division attacked to the East and the 15th Panzer Division attacked north towards Knightsbridge. The 9th Indian Division and 7th Armoured Division headquarters were scattered by these attacks. Whatever control was being asserted over the constituent units was lost. The 5th Indian Division HQ was at El Adem. The 22nd Armoured Brigade was hit by the 15th Panzer Division. What made the situation worse was that General Ritchie, the army commander, had no real idea that the situation and gone so badly wrong. This is based on the account in Vol.III of the Official History.

Wednesday, April 01, 2009

No one in command

As the situation worsened, it was every division for its self. The 7th Armoured Division and 5th Indian Division commanders both recognized that they had serious problems, but there was no corps commander between them and the army commander. The army commander was oblivious, so the divisions continued to commit their forces piecemeal, where they were defeated individually. The 2nd Armoured Brigade group was this skeleton organization with one tank regiment, one motor battalion, and one RHA regimentIt was sent off on its own towards a point to the south of Knightsbridge. At this point, on 5 June 1942, Rommel was formulating his plan of action, given the developing situation. This is based on the account in Vol.III of the Official History.

Sunday, March 29, 2009

the Gazala Battle turns against the British on 5 June 1942

Initially, the battle on 5 June 1942 favoured the British. Early in the morning, the battle turned and the Germans, particularly, had the advantage. The initial British thrust in the early morning dark succeeded only because the attacking forces stopped short of the main Axis force. The 22nd Armoured Brigade had a strength, before the fight, of 156 tanks. They were a mixture of Grants, Stuarts, and Crusaders. They quickly ran into heavy artillery fire and turned north. They left the infantry unsupported when they were struck by German tanks. The 2nd Highland Light Infantry were driven backwards onto the Gurkhas. The same sort of thing happened to the 2nd West Yorkshires. The British fought dispersed, without support and could be beaten in detail. The 32nd Army Tank Brigade had started their attack on the Sidra ridge with 70 infantry tanks and lost 50 before the attack was canceled. This is based on the account in Vol.III of the Official History.

Monday, March 23, 2009

The flawed command structure

The planned attack on the Cauldron was to be mounted with no single officer in command. Instead, there were these independent units involved, but operating on their own. The plan sounds like another typical 8th Army operations, with the forces sent off in all directions, acting alone. The 10th Indian Brigade would attack to the west. The 32nd Army Tank Brigade would attack south and take the Sidra Ridge. Following those movements, timed to happen sequentially, the 7th Armoured Division and 9th Indian Brigade would attack west into the Cauldron. Why could they have not been more concentrated and moved together? This was all to commence on 5 June 1942. This is based on the account in Vol.III of the Official History.

Saturday, March 21, 2009

Auchinleck's plan

By 2 June 1942, General Auchinleck wanted to mount an attack towards Bir el Temrad from the XIII Corps front. He was the only one in favor of such a move, as it was opposed by General Ritchie and his corps commanders. He had also thought about a turning movement around the southern end of the front, but gave it up in face of opposition and the questions about their ability to keep the attack supplied. He then decided that they would attack the Axis forces in the vicinity of "The Cauldron". The attack would be mounted on 5 June and would start with the 10th Indian Brigade and the with 4th RTR support easily took their objective. The other moves also went well, but that was because the Axis forces were further to the west than the plan had foreseen. The result was that the result was very bad. This is based on the account in Vol.III of the Official History.

Thursday, March 19, 2009

Other moves on 2 June 1942

Rommel tried to distract the British from Bir Hacheim by sending the 21st Panzer Division on a feint towards Eluet et Tamar on 2 June 1942. They encountered the 5th RTR and destroyed 12 of their tanks. The 5th RTR was one of the regiments in the 4th Armoured Brigade. That was the only major movement for a few days while both sides were working on recovering and repairing tanks and reorganizing for the next phase of the battle. The DAK had been reduced to just 130 runners from the total of about 320 tanks that they had at the start of the battle. This is based on the account in Vol.III of the Official History.

Friday, March 13, 2009

The fight for Bir Hacheim, starting 2 June 1942

The Germans and Italian forces moved on Bir Hacheim next. 2 June 1942 was a day of sand storms. On 3 June, the German air force started bombing Bir Hacheim. For their part, the RAF hit the easy targets presented by the concentrated German and Italian units moving on Bir Hacheim. The RAF shot down 16 German and Italian aircraft at the cost of 13 lost. The Free French forces were heartened by the strong air support.


British and Commonwealth ground forces were active, but mostly with Jock columns operating on the German supply lines that cut through the minefields at Trigh Capuzzo and the Trigh el Abd. Columns were drawn from the 1st South African Division, the 50th Division, and the 7th Motor Brigade. The one brigade-size attack was made by the 1st South African Brigade against the Trento Division. This is based on the account in Vol.III of the Official History.

Friday, March 06, 2009

Bir Hacheim


Rommel was in a somewhat more secure position by 2 June 1942. After taking the Sidi Muftah area, he intended to attack Bir Hacheim with some of his better infantry: the 90th Light Division and the Italian Trieste Division (motorized). The Official History notes that by this phase of the battle, Rommel had lost General Gause and Colonel Westphal to wounds.


Since 30 May, the British had been very active in the air, but by 2 June, they had taken many losses and had to stop low level attacks on Axis ground forces due to the dwindling stocks of Kittyhawks. The British had lost 50 aircraft in the first 5 days of the battle. The only good sign was the arrival of the first Spitfires in the fighter role. The plan was to use them to fly high cover for Hurricanes used as fighter-bombers. This is based on the account in Vol.III of the Official History.

Sunday, March 01, 2009

The battle turns against the British by 2 June 1942

General Ritchie seems to have been slow to react to the events of 30 May 1942. General Ritchie had planned an attack in the vicinity of where the 150th Brigade had been located. He hoped to destroy the Axis forces in the Cauldron, but the attack that was mounted was hopelessly inadequate. One battalion from 151st Brigade attacked Sidra ridge, but was rebuffed on the night of 1st/2nd June. The 10th Infantry Brigade never even responded, due to the late receipt of orders. While the British plan still-fired, Rommel was busy formulating new plans. His next objective was the Free French at Bir Hacheim. This is based on the account in Vol.III of the Official History.

Wednesday, February 25, 2009

The 150th Infantry Brigade was lost on 1 June 1942

The 150th Infantry Brigade had fought well against heavy odds, but they were unsupported. On 1 June 1942, they were heavily attacked by divebombers and were defeated by "concentric" attacks. The 150th Brigade had been holding five miles of ground, and had been attacked from all sides. The British Army command was so inept that Rommel was able to withdraw strong forces from "the Cauldron" to throw at 150th Brigade. 30th Corps had sent the 2nd and 22nd Armoured Brigades against Rommel's anti-tank screen and they had been rebuffed on 30 May. In typical fashion, parts of the 4th Armoured Brigade and 201st Guards Brigade had been sent off on foolish errands. At this point, General Ritchie and his commanders had lost control of the battle to Rommel. This is based on the account in Vol.III of the Official History.

Saturday, February 21, 2009

Against the 150th Brigade, starting early on 30 May 1942

The Germans had not been aware of the 150th Brigade, early on 30 May 1942, until they had tried to break through to the west, south of Sidi Muftah. They lost 11 tanks and stopped. The breakthrough force had included the 5th Panzer Regiment. The next day, the attack recommenced with greater force. The 90th Light Division and the Italian Trieste Division had been added. They were stopped and waited until 1 June, the next day, when they had strong divebombing support and elements of the 21st Panzer Division. The 150th Brigade was increasingly being pressed and was in great danger. This is based on the account in Vol.III of the Official History.

Tuesday, February 17, 2009

The 150th Infantry Brigade

Vol.III of the Official History gives the composition of the 150th Infantry Brigade on about 28 May 1942:

150th Infantry Brigade
commander: Brigadier C.W. Haydon

4th Battalion, East Yorkshire Regiment
4th Battalion, The Green Howards
5th Battalion, The Green Howards
D Company, 2nd Battalion Cheshire Regiment (MG)
72nd Field Regiment RA
25th/26th Medium Battery (7th Medium Regiment) RA
259th (Norfolk Yeomanry) Anti-Tank Battery RA
81st/25th LAA Battery RA
232nd Field Company RE

Sunday, February 15, 2009

Rommel changes his plans on 29 May 1942

Rommel decided that his plan to push north needed to be dropped due to his supply situation. His new plan, as of 29 May 1942, was to screen the British armour with anti-tank guns while his infantry broke a hole in the British minefields. That would solve his supply situation and "a way of escape, if need be". The British were over-confident and thought that he time was ripe for a counter-attack to defeat the Axis armour and disrupt the supply line. The whole idea that a counter-attack was possible was based on the mistaken idea that the Axis armour was trapped and was deteriorating. This is based on the account in Vol.III of the Official History.

Tuesday, February 10, 2009

Lord Lovat


Something reminded me of Lord Lovat today. I had seen a History Channel documentary when I was working away from home and came away with a mistaken impression of Lord Lovat's role in the Normandy invasion. I had thought that he had jumped into Normandy, but he actually went ashore at Sword Beach. He did lead part of his brigade, the 1st Special Service Brigade, to Pegasus Bridge to reach the airborne troops of the 6th Airborne Division who had gone in behind the beach in darkness. I can see that he was a charismatic leader of men in combat. I had not realized that his name was Simon Fraser although I had remembered that he was a Scot. This is the Wikipedia image of Lord Lovat in 1942 at Newhaven after Dieppe. Note that Lord Lovat was a 31-year old Lieutenant-Colonel in this photograph and was a 32-year old Brigadier at Normandy. By the wawy, he was known for carrying a Winchester rifle as his personal weapon in battle. The Wikipedia page has more about his life.

Saturday, February 07, 2009

The 150th Infantry Brigade late on 28 May 1942

The 150th Infantry Brigade commander, Brigadier C.W. Haydon, knew by late on 28 May 1942 that he was in trouble. He redeployed to defend in all directions, as an attach from the East, previously his rear, seemed very likely. Early on 29 May, he was joined by the HQ of 1st Army Tank Brigade with the 44th RTR and a squadron of 42nd RTR with 30 infantry tanks. The only bright spot for the British was that General Cruewell had to make a forced landing and was captured. He had been one of the key Axis commanders and his judgment and skill would be missed. This is based on the account in Vol.III of the Official History.

Tuesday, February 03, 2009

Action in the air over the Gazala Battle by 28 May 1942

For some reason, the British only attacked Axis transport for most of the time. Only by late 28 May 1942 did Bostons from No.12 Squadron SAAF hit Commonwealth Keep. This place remained in Axis hands, despite an attempt to retake it. Other Bostons hit the harbour at Derna, where a report had placed an Italian destroyer. Axis fighters and divebombers were very active over the battlefield. They mostly operated in a hit-or-miss fashion, because they had no information about the situation on the ground, which remained very fluid. In three days, the British lost 16 aircraft, while the Germans lost 10 and the Italians lost 7 aircraft. This is based on the account in Vol.III of the Official History.

Saturday, January 31, 2009

A critical fight on 29 May 1942

As the Axis mechanized forces closed on Knightsbridge on 29 May 1942, they were attacked by the 2nd Armoured Brigade. The brigade was locked in combat with the two German panzer divisions and the Italian Ariete Division. Two regiments from the 22nd Armoured Brigade joined the battle. A sandstorm prevented the 4th Armoured Brigade from reinforcing the British armour. The battle lasted through the day, but the German forces were now concentrated, unlike the British. The 90th Light Division had arrived to complete the German concentration. One casualty occurred when General von Vaerst was wounded. He commanded the 15th Panzer Division. Being a general serving with Rommel was a dangerous occupation. This is based on the account in Vol.III of the Official History.

Tuesday, January 27, 2009

Rommel's plan for 29 May 1942

Rommel saw that his forces were scattered across the desert and were desperately in need of supplies. The long route around Bir Hacheim in the south was vulnerable to attack. Rommel's plans were to concentrate his forces, to resupply them immediately, and to open a new supply corridor through the minefields. A corridor in the vicinity of the Trigh Cappuzo would be ideal. Colonel Westphal, as a good staff officer would do, took the initiative with General Cruewell to ask him to penetrate the minefields through 13th Corps in the North. He had the Italian Sabratha Division attack the South Africans, although they were repulsed. Simultaneously, Rommel personally led a supply convoy around the south to the Afrika Korps. This is based on the account in Vol.III of the Official History.

Thursday, January 22, 2009

At the end of 28 May 1942

Gemeral Ritchie was more satisfied with his situation at the end of the day on 28 May 1942 than was justified. The one dangerous situation was that the Italian divisions Trieste and Pavia were penetrating unprotected minefields "near the Trigh Capuzzo and Trigh el Abd". The British still possessed 240 running cruisers and 90 infantry tanks. They expected replacement tanks to arrive the next day in the form of 40 cruiser tanks and 30 infantry tanks. General Auchinleck thought that his forces were not feeling the necessary urgency, and was concerned. The British were feeling cocky, however, as they captured a copy of Rommel's plans. They figured that they had dealt the Axis forces a good blow. This is based on the account in Vol.III of the Official History.

Sunday, January 18, 2009

The air forces on 28 May 1942 at Gazala

The British air commander, Air Vice-Marshal Conyngham, was committed to provide low-level attacks on Axis forces in the battle. Fighter-bombers attacked targets near El Adem and Bir Hacheim on 28 May 1942. Fighter-bombers and day bombers probably hit the 15th Panzer Division, although in conditions of poor visibility. The British pretty much had free-rein over the battlefield on this day, as the Axis air forces were probably uncertain over their troops' positions in the mobile battle. This is based on the account in Vol.III of the Official History.

Wednesday, January 14, 2009

The next day: 28 May 1942

The 21st Panzer Division and the Ariete Division were able to move on 28 May 1942. The 21st Panzer Division penetrated very far north and took "Commonwealth Keep". The 1st Armoured Division commander, General Lumsden, had wanted to attack the 21st Panzer Division with his two armoured brigades, but the 22nd Armoured Brigade stayed with the 15th Panzer Division. The 2nd Armoured Brigade did attack the Ariete Division west of Knightsbridge. The 1st Army Tank Brigade also hit the Ariete Division from the northwest at the same time. The 4th Armoured Brigade hit the 90th Light Division and pushed it to the south and west. This is based on the account in Vol.III of the Official History.

Sunday, January 11, 2009

The Axis forces at the end of 27 May 1942

The Axis forces had penetrated deep behind the British front at Gazala by dusk on 27 May 1942. The 15th and 21st Panzer Division were just west of El Adem, but had lost one third of their tanks. The 15th Panzer Division was short of fuel and ammunition. The 90th Light Division was somewhat farther east, south of El Adem. The Italian Ariete Armoured Division had attacked Bir Hacheim, but was repulsed. The Trieste Motorized Division had turned north too quickly and was trapped in minefields west of the Gazala line. The DAK headquarters was trapped, without support, just south of Bir Harmat. Rommel's response to the situation was a planned advance with the remaining mobile force, the 21st Panzer Division. This is based on the account in Vol.III of the Official History.

Wednesday, January 07, 2009

The airforce on the first day of the Gazala Battle


The rapidly changing situation effectively neutralized the Desert Air Force, except in the south. The British fixed positions held out and allowed the light bombers and Kittyhawk fighter-bombers to safely operate in support. They were able to punish the 90th Light Division. German fighter operations, including over the forward airfields necessitated withdrawing needed fighter squadrons to fields farther east. Still, South African Bostons acting in the "intruder" role hit airfields near Tmimi and those that were dispersed.


The British were relatively pleased with the situation by nightfall of 27 May 1942, while Rommel was not pleased. The axis forces had lost fully one third of their tanks on that day, despite having penetrated fairly deeply into British lines. This is based on the account in Vol.III of the Official History.

Friday, January 02, 2009

The British try to strike back

The 30th Corps commander ordered the 1st Armoured Division to intervene in the battle as the first day progressed. The 22nd Armoured Brigade was the closest unit, being about 12 miles from the attack on the 4th Armoured Brigade. The 2nd Armoured Brigade was further north, between El Adem and Knightsbridge. The 22nd Armoured Brigade had the ill fortune to be attacked by the 15th and 21st Panzer Divisions. The brigade lost 30 tanks and some guns. The 2nd Armoured Division commander, General Lumsdem, directed the brigade to fall back towards Knightsbridge. Both armoured brigades were able to attack together and damage the Germans in the process. The 1st Army Tank Brigade attacked from northwest of Knightsbridge and also inflicted some damage on the Germans. This is based on the account in Vol.III of the Official History.

Tuesday, December 30, 2008

British problems at Gazala

The British lack of success in the Desert at the Battle of Gazala seemed to have been caused by several factors: the unwillingness to fight with concentrated forces and the poor communiction between forces at the front and the commanders in headquarters in the rear. The Germans solved the second problem by having commanders lead their troops at the front. The disadvantage of that was that commanders were often killed or captured and they risked being out of touch with their forces that were not in their immediate vicinity. The Germans fought with concentrated groups of all arms that were highly mobile (when they were supplied). The British tried to have troops everywhere and to cover large expanses with small forces. That meant that they were always fighting superior forces and had their small groups overwhelmed by the concentrated German and Italian battlegroups in Rommels army.

Tuesday, December 23, 2008

The next blow: 7th Armoured Division HQ overrun

Soon after the neutralization of the 4th Armoured Brigade, the 7th Armoured Division advanced HQ was overrun by German armoured cars and General Messervy and some staff officers were captured near Bir Beuid. The 30th Corps commander did not learn of the loss until later on the night of 27 May 1942. General Messervy was able to escape, but the 7th Armoured Division was without a commander for another two days. The Army Commander, at first, wouldn't believe that it had happened until 28 May. This is based on the account in Vol.III of the Official History.

Saturday, December 20, 2008

27 May 1942 early in the day

Brigadier Filose, 3rd Indian Motor Brigade commander, told General Messervy at about 6:30am that he was faced with a German panzer division. In fact, it was the Italian Ariete Armoured Division and some 21st Panzer Division tanks. The 3rd Indian Motor was overrun and lost prisoners and equipment. The survivors were sent back to Egypt to reform the brigade. Two hours later, the Axis forces attacked the 7th Motor Brigade, commanded by Brigadier Renton, at Retma. Brigadier Renton was able to withdraw his brigade to Bir el Gubi. After 7:30am, the 4th Armoured Brigade, ordered forward to support the 3rd Indian Motor Brigade, was hit by the 15th Panzer Division The 8th Hussars ceased to exist as a coherent unit and the 3rd RTR was "roughly handled". the 4th Armoured Brigade was able to damage the German division, but had to withdraw towards El Adem. The 90th Light Division followed the British brigade for a while. The British seemed to have made the usual mistake of committing their units piecemeal. This is based on the account in Vol.III of the Official History.

Wednesday, December 17, 2008

The battle starts: 26 May 1942

The Battle of Gazala started on the afternoon of 26 May 1942 when General Cruewell's battle group moved out towards the British positioned between Gazala and Sidi Muftah. The battle group was seen by British screening forces consisting of elements of the 4th South African Armoured Car Regiment and the 2nd King's Royal Rifle Regiment from the 7th Motor Brigade. They followed a column that was heading for Bir Hacheim, where the Free French were located. Rommel's Operation Venezia had commenced, but without surprise. At 6:30am on the 27th, the 3rd Indian Motor Brigade was overrun after a short battle. They lost 440 men and what little equipment they had. this is based on the account in Vol.III of the Official History.

Sunday, December 14, 2008

The Battle of Gazala in three phases

In Chapter X of Vol.III of the Official History, the Battle of Gazala is described as having three phases. The first phase was 26 to 29 May 1942. This commenced with the sweep around the British southern flank by German mobile forces. This failed to dislodge the British forces that were in the line stretching south from the sea to the far end at Bir Hacheim. In the second phase, the Axis mobile forces sat in "the Cauldron" turned on the defensive, decisively defeating a British attack on 5 June. The third phase was the deciding attack on 11 to 13 June that defeated the British armoured forces. In response, General Ritchie resigned the British to defeat and planned to withdraw towards Egypt. This is based on the account in Vol.III of the Official History.

Wednesday, December 10, 2008

The start of the battle: 26 May 1942

The Battle of Gazala lasted four weeks and ended with the capture of Tobruk. The first phase started in the afternoon on 26 May 1942 when the DAK and Italian 20th Corps started forward to the southeast with the intent to sweep around the southern flank of the Gazala line. Four Italian infantry divisions (Sabratha, Trento, Brescia, and Pavia were opposite the British infantry positions west of Gazala. The Italian Trieste motorized division turned too soon by mistake and was separated from the main body. That left the Ariete Armoured Division, the 15th and 21st Panzer Divisions, and the 90th Light Division to sweep down around Bir Hacheim. This is based on the account in Vol.III of the Official History.

Sunday, December 07, 2008

The air forces in late May 1942

The British waited for the coming Axis offensive in a distinctly inferior position in the air. They were both at a numeric and a qualitative disadvantage. There were 312 Italian and 392 German aircraft in North Africa, "of which 497 were servicable". The British only had 320 aircraft in the "Desert Air Force", but they only had about 190 servicable aircraft of that number. Admittedly, in the entire Middle East, the British had 739 servicable aircraft, but the Axis had about 1000 aircraft. Besides, the British did not have a fighter that could compete with the Bf-109f.

Thursday, December 04, 2008

The opposing sides

Not counting the Italian Littorio Armoured Division, which was still in the process of arriving in the desert, the Axis forces had the following strengths:

332 German tanks
50 Pzkw IIs
223 Pzkw IIIs
19 Pzkw IIIJ 50mm L60
40 Pzkw IVs

228 Italian tanks
mostly M13/40 and M4/41 tanks

In reserve
10 Pzkw IIs
38 Pzkw IIIs
19 Pzkw IIIJ 50mm L60
1 Pzkw IV
9 Pzkw IV Ausf F2 75mm L43


The British had a considerable force, as well:

1st and 7th Armoured Divisions
167 Grant tanks
149 Stuart tanks
257 Crusader tanks

1st and 32nd Army Tank brigades
166 Valentine tanks
110 Matilda tanks

1st Armoured Brigade (ordered to join)
75 Grant tanks
70 Stuart tanks


This is based on the account in Vol.III of the Official History with German tank types from Peter Chamberlain and Chris Ellis

Tuesday, December 02, 2008

The Axis plan

Axis leaders decided on 1 May 1042 that Rommel should attack at the end of May with the aim of capturing Tobruk. They wanted Rommel to stop at the Egyptian border and wait for Malta to be captured. Rommel intended to feint near the sea while he, Rommel, led a force consisting of the German mechanized forces and the Italian XXth Corps driving through Bir Hacheim and then turn northwards. This is based on the account in Vol.III of the Official History.

Friday, November 28, 2008

British expectations circa 20 May 1942

General Ritchie actually foresaw that the Axis attack would go south around the end of the British defensive line. General Auchinleck thought that would be a possibility, but really expected that Rommel would feint to the south and attack through the defensive line. Whatever happened, General Auchinleck wanted to keep the British armour concentrated. The uncertainty, however, led the other commanders to position the 7th Armoured Division further south behind Bir Hacheim while the 1st Armoured Division was north, to the southwest of Tobruk, near El Adem and Knightsbridge. This is based on the account in Vol.III of the Official History.

Monday, November 24, 2008

The British defences in the Desert in late May 1942

The British forces, in late May 1942, were spread across the desert. The 1st South African Division, with the lost brigade replaced by the 9th Indian Infantry Brigade Group sat to the immediate west of Gazala and stretched a short distance from the coast. One their flank was situated the 50th Division. The 150th Brigade, from the 50th Division, was located further southeast, leaving a gap defended only by the minefield. The 1st Free French Brigade Group lay isolated and exposed at Bir Hacheim far to the south. To their east, about 15 miles, sat the two armoured divisions (the 1st and the 7th). This is based on the account in Vol.III of the Official History.

Thursday, November 20, 2008

May 1942

The downside of having the huge stockpile of fuel and supplies at Belhamed was that the base was really too far forward. That meant once the battle started, the British were forced to use forces to defend Belhamed rather than to be able to fight as the battle flowed. Already by 10 May 1942, General Auchinleck was informed that the British needed to fight in May, and as soon as possible, as a German offensive was imminent. The army was still not really prepared to fight. General Ritchie's forces were widely spread across the desert, generally out of supporting distance. The Free French at Bir Hachiem, were hung out 13 miles from the 150th Infantry Brigade and six from the 69th Infantry Brigade. With their forces spread out wide, they relied heavily on minefields to block the gaps. This is based on the account in Vol.III of the Official History.

Tuesday, November 18, 2008

British preparations up to 25 May 1942

General Auchinleck had hoped to be able to build up the British army in the Western Desert to the level that they would be superior in strength to the Axis army. He did not want to be pushed into a premature action where the strength that they had would be squandered. To be ready for the planned offensive, the British had built three forward bases: Tobruk, Belhamed, and Jarabub. Belhamed was the largest with 26,000 tons of supplies. Tobruk had 10,000 tons and Jarabub only had 1,000 tons. The coastal railroad was pushed forward so that the railhead was now up to Capuzzo. By late May, they had reached Belhamed, although the railhead was still incomplete and temporary. By the 25 May 1942 date, they had 80% of the supplies that were needed, although they only had two thirds of the fuel that they wanted to have on hand. The shortfall was created by the loss of fuel ships to attacks on the run west along the coast. This is based on the account in Vol.III of the Official History.

Saturday, November 15, 2008

Grants and 6pdr anti-tank guns by May 1942

As Grants arrived in the desert, the expedient measure was taken of mixed armoured regiments. A portion of the regiments were equipped with two Grant squadrons and one Stuart squadron. Another variant organization had two Crusader squadrons and one Grant squadron. The plan was for some armoured brigades to have all Grants and Stuarts, while others would be equipped with Crusaders and Grants. The armoured divisions still had two armoured brigades, as the new organization with one armoured brigade and one motor brigade was still just a plan and had not been implemented. In the event, the Germans attacked before the British were ready. The best British equipment were the Grants and the 112 6pdr anti-tank guns which had arrived. At least the three British armoured brigades were up to strength in tanks at the time of the Axis attack. This is based on the account in Vol.III of the Official History.

Thursday, November 13, 2008

New equipment in the Desert in early 1942


The British had received Crusader II tanks with thicker armour but still very unreliable mechanically. They still did not have capped armour piercing rounds to deal with German face-hardened armour. Only the American Stuart tanks had capped armour piercing rounds, but only of 37mm caliber.


The Germans started to receive new Pzkw III tanks ("Specials") with the 50mm Kwk L60 gun developed to deal with the Russian T-34 tanks. While most of the Pzkw III tanks on hand only had the 50mm KwK L42 guns, they had 19 of the Specials by the beginning of the Gazala battle.


The one bright spot for the British is that they now were receiving American-made Lee tanks (they were generally called Grants, but the first arrivals were actually named the General Lee tank). The Lee and Grant tanks had a hull-mounted 75mm gun in a sponson. The gun was medium velocity, but fired a useful HE round which was useful against German soft vehicles, infantry, and artillery. This is based on the account in Vol.III of the Official History.

Sunday, November 09, 2008

Reorganizing the army in the desert

General Auchinleck had been displeased with the lack of coordination between infantry, armour, and artillery during the Crusader battle. He made organizational changes to reshape units more in line with what the Germans were thought to use. Armour divisions no longer would consist of two armour brigades and a support group, but would have one armour brigade and one motor brigade, with supporting artillery at the division level. Infantry brigades and motor brigades gained artillery which had been segregated in the past. The infantry tanks were kept in the Army tank brigades, not attached to divisions. This is based on the account in Vol.III of the Official History.

Friday, November 07, 2008

The Desert Air Force from February to May 1942

The Desert Air Force needed time, just like the Army, for "rest, refitting, and training". There problem was that there was no time for anything but intensive operations. Those operations proceeded with difficulty for a number of reasons. The new Hurricane Mk.IICs with four 20mm cannon mechanisms were clogged by dust. Kittyhawks had problems with their Allison engines and were difficult for Hurricane pilots to learn to fly. From early February 1942 to late May, "nearly 14,000 sorties" were flown. At the cost of almost 300 aircraft lost, the destroyed "89 German and over 60 Italian aircraft". All this occurred during the lull in ground operations following the German advance from El Agheila after the Crusader Battle. This is based on the account in Vol.III of the Official History.

Sunday, October 26, 2008

The Axis air effort in April to May 1942

The Axis air effort in March 1942 had concentrated on eliminating Malta as a threat against Axis shipping. They succeeded in that effort. By April, they concentrated against targets that would help the planned May land offensive. They hit Tobruk, the railroad along the coast, the forward airfields and troops deployed near the front. Particularly the German air force recommenced hitting Alexandria and the Suez Canal. the British night fighters of No.89 Squadron had a field day against Axis night bombers. Fighters and bombers were shifted from Sicily to North Africa, as well as to Greece and Crete. The operational tempo greatly increased by the third week of May. This is based on the account in Vol.III of the Official History.

Sunday, September 21, 2008

Increased air activity from March


Because of the convoy run from Alexandria to Malta in March 1942, the air activity increased considerably. The British made a special effort against the Axis air forces, especially the Luftwaffe. In conjunction with the convoy, the army conducted raids against Rommel's army. These were supported by fighter cover and resulted in three Me-109's destroyed, although at the cost of five Kittyhawks and one Hurricane. At the same time, Wellington bombers raided airfields and ports.


When the Germans started flying supplies and troops over the sea in Ju-52's, long-range Kittyhawks and Beaufighters were sent against them. After a successful action on 12 May 1942, the Germans resorted to escorting the Ju-52's with Me-109's fitted with "extra fuel tanks". This is based on the account in Vol.III of the Official History.

Sunday, September 07, 2008

Axis fighter-bombers

The Axis air forces in the desert started using fighter-bombers in response to the British operations. El Adem and Gazala received visits from Me-109 fighter-bombers, which achieved "considerable success". Due to the impact of dust on operations, the British pulled their fighters back to Gambut and Gasr el Arid. They were further from the front, which gave sufficient time to intercept German raiders. They also had better communications and AA defenses. Before ground operations began in May, British fighters mainly operated in defense of Tobruk, shipping, roads, rail transport, and airfields. They had to contend with Me-109's using the sun to attack. Four Hurricanes were jumped by six or eight Messerschmitts. Two were shot down and two were badly damaged. The British adopted the tactic as well with equal success. They shot down six Macchi 200 fighters over Tobruk. This is based on the account in Vol.III of the Official History.

Sunday, August 17, 2008

The air war in March through May 1942


After the British fighter bombers and day bombers achieved some successes against Axis airfields in Western Cyrenaica, the Germans resolved to do something to put a stop to it. They decided to go after British airfields with the aim, as the Official History quotes, "to regain air supremacy".


The British aircraft also staged a low level of attacks on the Axis supply line. Why this was only a low level, we have a hard time understanding, but that is what it was. During this period, about one hundred sorties against ground targets were carried out by Beaufighters, Hurricane and Kittyhawk fighter-bombers. Particularly successful were the Hurricanes that operated at night against encampments, transport, and aircraft.


Another change was that tactical reconnaissance units were replacing Hurricane Is with Tomahawks. In the period leading up to May, tactical reconnaissance in the forward areas was critical, so the effort to improve the survivability of reconnaissance aircraft was very important. This is based on the account in Vol.III of the Official History.

Sunday, August 10, 2008

Malta neutralized


Unlike May and June 1941, Malta was not a factor in the war in North Africa in May 1942. A few Wellingtons still operated from Malta, but they were only able to make sixty sorties against Tripoli during the "lull" in the fighting. They did have a few successes while raiding Palermo, Sicily, sinking or damaging ships.


Only Liberators from Egypt could now hit Tripoli, and they only arrived in numbers by May 1942. Because of that, the main successes against Axis shipping were achieved by raiding Benghazi, due to the closeness of Desert air fields. Bombers operating around the clock made 741 sorties against the port and installations at Benghazi from February to May. As the enemy showed signs of an imminent land attack, Kittyhawks and Bostons appeared over Benghazi during daylight. The attacks seemed to not seriously interrupt the supply buildup, however. This is based on the account in Vol.III of the Official History.

Sunday, July 27, 2008

Fighter Bombers

In the Spring of 1942, there was a shortage of British day bombers in North Africa. As a way to make up for the shortage, fighters came to be fitted with "one or more bombs". Fighters could always shed their bombs if they needed to perform as fighters, so there was little negative about their role as fighter bombers. Both Hurricanes and Kitty Hawks were fitted with bombs in May 1942. One Hurricane and three Kitty Hawk squadrons started operations as fighter bombers. Initially, they carried two 250lb bombs, but Kitty Hawks eventually came to be armed with a single 500lb bomb. This is based on the account in Vol.III of the Official History,

Sunday, July 20, 2008

Day Bombers

The priority for day bomber crews was bombing practice. The usual altitude was eight to ten thousand feet, in level flight. Training also was conducted in 15,000 foot altitude bombing and bombing in a shallow glide. The Douglas Boston was replacing the older day bombers and had the advantage of higher speed than the Martin Maryland and Bristol Blenheim. The new arrangements in late spring of 1942 facilitated greater cooperation between British fighters and day bombers. Now, the two were based in close proximity and that allowed the fighters to usually escort the bombers. Interestingly, one of the new procedures was to avoid flying "down sun". This is based on the account in Vol.III of the Official History.

Saturday, July 12, 2008

The Bf-109F threat (Me-109F)

The Bf-109F (the official history calls it the Me-109F) was present in enough strength in early 1942 that the fighter plane was causing problems for the British over the desert (as many problems as it was causing the Russians). British pilots tended to be under trained in the desert and they were not very accurate in firing. As part of the measures implemented to better counteract the Bf-109F, British pilots started "shadow firing", rather than firing at a towed drogue. Radar coverage had improved to better detect low-flying Bf-109F's and there were more ground observers equipped with radios. For more flexibility and to reduce the number of targets for the German planes, the British instituted patrols with 4 to 6 fighters. This is based on the account in Vol.III of the Official History.

Sunday, July 06, 2008

The British air force in the Middle East


By Spring 1942, the British air strength was greatly strained by the military situation. They were especially short of trained aircrew. One of the ongoing complaints about the air crews in the Middle East was the lack of operational training. The Middle East needed reinforcements, but the home forces were so taxed that there was little available to send. Bomber Command was in such as state that there was only one pilot per heavy bomber at this date. The Air Ministry reacted negatively to Air Marshall Tedder's plea for more air crew for the Middle East, but they stretched enough to send some reinforcements.


An important piece of the plans for the upcoming land offensive was to have a stronger air strength available to both protect the troops and to attack the Axis forces on the ground and sea. A new fighter group headquarters, No.211 Group, was built from two wing headquarters. Group Captain K.B.B. Cross was the first commander. He had been a senior wing commander during the recent Crusader battle. This is based on the account in Vol.III of the Official History.

Saturday, June 21, 2008

Richard O'Connor

I was reading the Wikipedia entry for General Sir Richard O'Connor, who beat the Italians in Operation Compass that took Cyrenaica from the Italians, starting from late 1940 and ending at Beda Fomm. What interested me was that O'Connor served under J.F.C. Fuller, as brigade major of the Experimental Brigade, from 1921 to 1935. General Fuller was an early advocate for the use of combined arms forces, including armour, artillery, infantry, and aircraft in support. O'Connor had this mysterious knowledge about mobile forces that I could not explain.

Wednesday, June 18, 2008

The Royal Air Force in the Desert from February to May 1942

The end of the Crusader Battle left the RAF to rebuild. They had suffered great losses in the battle during a transition period when some aircraft types were out of production while their replacements were slow in arriving. As the Hurricane I had lost its effectiveness, there were not many Hurricane IIs in the pipeline. This was the case for a number of aircraft:

Old Model Status New Model Status
Hawker Hurricane I outperformed Hawker Hurricane II slow in arriving
Curtis Tomahawk production ended Curtis Kittyhawk few arriving
Martin Maryland production ended Martin Baltimore few arriving,
needed modifications
Bristol Blenheim IV engine troubles Douglas Boston engine troubles


One positive move was the arrival of Consolidated Liberator and Handley Page Halifax heavy bombers in the Middle East. They were much more capable than the older Vickers Wellington medium bombers. They belonged to the original twin-engined heavy bomber category that had gradually become obsolescent. This is based on the account in Vol.III of the Official History.

Monday, June 09, 2008

Malta and North Africa in May 1942

The Middle East commanders continued to obliviously send communications to Britain that greatly incensed the prime minister and the Chiefs of Staff. For example, on 9 May 1942, they stated that they thought that the loss of Malta would not be fatal to the position in North Africa, as long as the supply lines through the Indian Ocean remained open. The restated their opinion, which proved correct, that an attack without adequate force strength would result in the loss of the attackers. If there was no reserve, Egypt would be lost. They did acknowledge that the Axis forces seemed to be grouping for an attack on the Gazala line. The Middle East commanders thought that such an attack risked the loss of significant Axis strength and might even open the way to a successful counterattack. The Prime Minister would have none of it, however: "We are determined that Malta should not be allowed to fall without a battle being fought by your whole army for its retention". This is based on the account in Vol.III of the Official History.

Sunday, June 01, 2008

The Chiefs of Staff and Prime Minister force premature action

The Prime Minister and Chiefs of Staff refused to acknowledge that the army in North Africa was seriously out-matched by the Axis forces in May 1942. They were back to the late 1940 mentality that thought that the army needed to go forward when needed, regardless of the consequences. Strategic factors outweighed the facts on the ground. General Auchinleck was also concerned about the situation in the Far East and was fully prepared to go in the defensive so that more forces could be sent East. The concern in Britain, though, was that Malta was very vulnerable and could be easily lost. They felt that such a loss would seriously compromise the entire Commonwealth defense posture. Therefore, the army had to attack soon to relieve the pressure on Malta and allow air forces to operate closer in support. Those in Britain also had reason to expect an Axis attack in North Africa in June and wanted to forestall that attack. This is based on the account in Vol.III of the Official History.

Amazon Ad