Monday, May 25, 2009

12 June 1942 at Knightsbridge

British tactical communications seem to have been atrocious as the time of the Gazala battle. Conditions were hazy with a lot of dust in the air. The German anti-tank gunners used this as cover to push their guns forward. The deadly guns were the 50mm PAK38's, which had an extremely low-silhouette. They chewed up British armour on 12 June 1942, near Knightsbridge. General Lumsden, the 1st Armoured Division commander, was out of communication with his corps commander, General Norrie, so he was left to make his own decisions. General Lumsden knew that he had taken heavy losses and was in no place to go on the offensive. General Norrie, who had lost touch with the battle, still was thinking of offensive operations. General Lumsden decided to continue to hold Knightsbridge, inspite of his heavy losses. This is based on the account in Vol.III of the Official History.

Tuesday, May 19, 2009

The air battle on 11 and 12 June 1942

The British air forces saw the Axis movements north from Bir Hacheim later in the day on 11 June 1942. By the morning of 12 June, they knew that the 90th Light Division was near El Adem and commenced to attack them from the air, almost continuously. The 90th Light Division found these attacks to be non-effective and only a minor nuisance. There were about twenty low-level attacks by British aircraft during the day. The British had the air to themselves, however, on 12 June, as the Axis air forces were absent from the battle near El Adem. They were busy near Knightsbridge and Acroma. The biggest attack was a 100 plane raid at about 8pm which was intercepted by six British fighter squadrons. A huge air battle ensued. British fighters flew 583 sorties on the day. This is based on the account in Vol.III of the Official History.

Saturday, May 16, 2009

The Gazala Battle on 12 June 1942 turns against the British

The 30th Corps commander, General Norrie, decided to go on the offensive, early on 12 June 1942, since he believed that the Axis forces were dispersed. He wanted the 2nd and 4th Armoured Brigades to head south and then attack the 15th Panzer Division. The 7th Armoured Division commander, General Frank Messervy, disagreed with this move, and decided to go and talk with his corps commander in person. Near El Adem, he encountered Axis forces and was "out of touch with everyone". Since they never got the order to advance, the two armoured brigades sat and fought off a half-hearted attack by the 15th Panzer Division, which was supposed to keep a defensive posture. At noon, Rommel decided to hit the 2nd and 4th Armoured Brigades from front and rear with his two panzer divisions. Since General Norrie could not find General Messervy, he put the 7th Armoured Division brigades under the command of the 2nd Armoured Division commander, who brought forward the understrength 22nd Armoured Brigade. At this point, the 2nd and 4th Armoured Brigades were hit by the 15th Panzer Division. The 4th Armoured Brigade went over the escarpment, partly by mistake and partly because of the Axis attacks. The British had sustained heavy tank losses due to skillful use of anti-tank guns, which were pushed forward. General Norrie did not know about the losses that had been taken, and assumed that they armour was still intact. This is based on the account in Vol.III of the Official History.

Wednesday, May 13, 2009

The British tank situation on 12 June 1942

The British tank situation on 12 June 1942 was not as good as General Ritchie had believed, but they still had a fairly strong tank force:

Grants Stuarts Crusaders Infantry tanks
2nd Armoured Brigade 17 3 25

4th Armoured Brigade 39 56

22nd Armoured Brigade 27 5 34

32nd Army Tank Brigade 63

7th Motor Brigade 16
(detachment of the
2nd Royal Gloucestershire
Hussars)


The British had 83 Grants, 64 Stuarts, and 59 Crusaders, for a total of 206 cruiser tanks. They also had the 63 infantry tanks, mostly Valentines, but probably some Matildas, as well. There is a slight possibility that they could have had some A.10 Cruiser Mk.II, which had a similar speed to the Valentine. The 32nd Army Tank Brigade was the reconstituted 3rd Armoured Brigade, from early 1941. They definitely had some of the older A.9's and A.10's, if not A.13's in 1941. This list draws upon Note 1 from page 240 in Vol.III of the Official History.

Saturday, May 09, 2009

German armour on 11 June 1942

On 11 June 1942, the Axis tank strength was greatly reduced. There were 27 Pzkw IIIJ (or perhaps Pzkw IIIL), 6 Pzkw IVF2, 25 Pzkw II, 83 various models of Pzkw III, and 8 Pzkw IV tanks. There were also about 60 Italian M13/40 and M14/41 tanks. Rommel ordered the 15th Panzer Division, 90th Light Division, and Italian Trieste Motor Division to move towards El Adem. 21st Panzer Division was to show activity north from Sidra ridge. That led General Norrie to believe that he might have an opportunity to strike the Axis forces, which he thought were dispersed. This is based on the account in Vol.III of the Official History.

Tuesday, May 05, 2009

The British defences on 11 June 1942

A minefield stretched from Acroma to the sea and blocked the Axis forces to the west. Acroma, itself had its crossing held by the 2nd Scots Guards. The 29th Indian Infantry Brigade held El Adem. The 201st Guards Motor Brigade held Knightsbridge. The 2nd South African Division held the Tobruk fortress. The 1st South African and 50th Division defences at Gazala were still unbreached. The infantry defences were, therefore, relatively well positioned. The armour was in much worse shape, and to make matters worse, the strength was less than General Ritchie realized. The artillery was also greatly diminished. A full seven field artillery regiments had been lost in the battle to date. This is based on the account in Vol.III of the Official History.

Saturday, May 02, 2009

By 11 June 1942

As of 11 June 1942, the British defensive front at Gazala continued to hold, despite the Axis successes. The front was stabilized by the two divisions that were still intact: the 1st South African and the 5th Division. Besides that small units were spread across the desert in strong points with infantry, anti-tank guns, and field artillery. The anti-tank guns were in short supply, however. The infantry and especially the armour were becoming increasingly fractured. Because of the difficulties in resupplying units with tanks and soldiers, the armoured units had become mixtures composed from many different units. Worse, yet, while General Ritchie thought that on 10 June, he still had 250 cruiser tanks and 80 infantry tanks, he only had 77 Grants, 52 Crusaders, 56 Stuarts, and 63 infantry tanks. All the infantry tanks were in the 32nd Army Tank Brigade. This is based on the account in Vol.III of the Official History.

Monday, April 27, 2009

The 1st Free French Brigade Group

The 1st Free French Brigade Group were the defenders of Bir Hacheim. The brigade consisted of the following units:

2e bataillon Légion étrangère
3e bataillon Légion étrangère
2e bataillon de marche de l'Oubanghi
1er bataillon d'infanterie de marine (coloniale)
1er bataillon du Pacifique
1er regiment d'artillerie
1er bataillon de fusiliers marins (AA)
an anti-tank company, engineers, signal, medical,
signal, and administrative troops

They had 26 field guns, 62 anti-tank guns, and 44 mortars


This is from Footnote 1 on page 237 of the British Official History.

Thursday, April 23, 2009

Back to Bir Hacheim

While the Cauldron battle was being fought, the 90th Light Division and Italian Trieste division had been trying take Bir Hacheim in the south. They had good air support, although the support was very grudgingly given. Rommel had decided that Bir Hacheim needed to be taken by 8 June 1942 so that they could return to the task of attacking the Gazala line from the rear. To bolster the attack, Rommel sent the 15th Panzer Division south to join the battle. British columns operated outside the Bir Hacheim perimeter. They were formed from the 7th Motor Brigade, the 29th Indian Infantry Brigade, and the Free French. By 8 June, the air attacks had increased in intensity. 58 bombers escorted by 54 fighters were used in the attacks. The Free French needed help, but the army was not able to immediately help. Instead, the RAF mounted 478 sorties on 8 June against the Axis forces attacking Bir Hacheim. On 9 June, the British air effort was greatly diminshed. General Ritchie decided early on 10 June that the French needed to withdraw from Bir Hacheim,as they could not be sustained in that position. Rommel personally led a DAK attack that broke into Bir Hacheim from the north. The 7th Motor Brigade arrived with a large motor convoy and embarked 2700 men from the original 3600 and took them away successfully. This is based on the account in Vol.III of the Official History.

Sunday, April 19, 2009

Defeat in the Cauldron

The British attempt to destroy the Axis forces in the Cauldron was a failure. The Axis forces admired the "courage and self-sacrifice" of the British soldiers, but that was not enough to overcome the command problems that existed. Rommel seems to have been successful in allowing the British to attack and be defeated. The best of the British tactics, artillery concentration and infantry attacking at night, were not enough. Once the battle was underway, the British had lost control of the action while Rommel personally commanded the battle as it progressed. But the battle for the Cauldron was over and the focus would shift to Bir Hacheim. This is based on the account in Vol.III of the Official History.

Wednesday, April 15, 2009

The Hurricane IID arrives in the desert
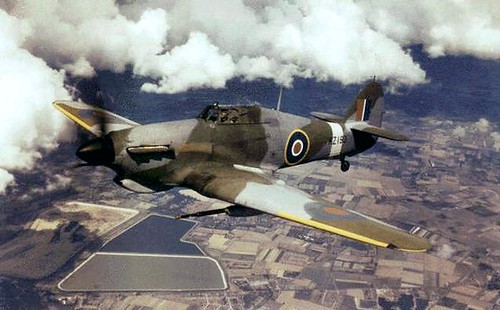


About this time, 6 June 1942, the first Hurricane IID aircraft arrived in the Desert. No.6 Squadron had nine when the squadron started operations. Their 40mm cannon seemed too large for the Hurricane. Because of the weight of the guns, the Hurricanes were stripped to reduce weight. With the guns, with 15 rounds each, they were still very overweight. Still, they could destroy Axis tanks with hits to the thin upper armour.

Sunday, April 12, 2009

"The Cauldron" lost on 6 June 1942

For some reason, the RAF was not able to effectively intervene in the battle for the Cauldron on 6 June 1942 when infantry and artillery was attacked by the Axis forces. The RAF frequently turned down requests for support during the day. This was at point B180, which was south-southwest of Knightsbridge. There were a Gurkha battalion and two Indian battalions, along with the 50th Reconnaissance Battalion and three RA Field Regiments and one RHA regiment. The Royal Artillery fought to the death, killed at their guns. A very few infantrymen escaped to the east. 7th Armoured Division was not able to intervene, despite having the 2nd and 4th Armoured Brigades. The usual problem occurred. Rommel knew what was happening, while the British commanders had lost touch with the the battle. They were not able to follow events as they happened. This is based on the account in Vol.III of the Official History.

Sunday, April 05, 2009

Chaos erupts: the divisional headquarters are overrun or dispersed

The Official History does a poor job of mentioning the date when events happen. Apparently, still on the afternoon of 5 June 1942, Rommel decided to go on the offensive with his mobile forces. The Ariete Division and the 21st Panzer Division attacked to the East and the 15th Panzer Division attacked north towards Knightsbridge. The 9th Indian Division and 7th Armoured Division headquarters were scattered by these attacks. Whatever control was being asserted over the constituent units was lost. The 5th Indian Division HQ was at El Adem. The 22nd Armoured Brigade was hit by the 15th Panzer Division. What made the situation worse was that General Ritchie, the army commander, had no real idea that the situation and gone so badly wrong. This is based on the account in Vol.III of the Official History.

Wednesday, April 01, 2009

No one in command

As the situation worsened, it was every division for its self. The 7th Armoured Division and 5th Indian Division commanders both recognized that they had serious problems, but there was no corps commander between them and the army commander. The army commander was oblivious, so the divisions continued to commit their forces piecemeal, where they were defeated individually. The 2nd Armoured Brigade group was this skeleton organization with one tank regiment, one motor battalion, and one RHA regimentIt was sent off on its own towards a point to the south of Knightsbridge. At this point, on 5 June 1942, Rommel was formulating his plan of action, given the developing situation. This is based on the account in Vol.III of the Official History.

Sunday, March 29, 2009

the Gazala Battle turns against the British on 5 June 1942

Initially, the battle on 5 June 1942 favoured the British. Early in the morning, the battle turned and the Germans, particularly, had the advantage. The initial British thrust in the early morning dark succeeded only because the attacking forces stopped short of the main Axis force. The 22nd Armoured Brigade had a strength, before the fight, of 156 tanks. They were a mixture of Grants, Stuarts, and Crusaders. They quickly ran into heavy artillery fire and turned north. They left the infantry unsupported when they were struck by German tanks. The 2nd Highland Light Infantry were driven backwards onto the Gurkhas. The same sort of thing happened to the 2nd West Yorkshires. The British fought dispersed, without support and could be beaten in detail. The 32nd Army Tank Brigade had started their attack on the Sidra ridge with 70 infantry tanks and lost 50 before the attack was canceled. This is based on the account in Vol.III of the Official History.

Monday, March 23, 2009

The flawed command structure

The planned attack on the Cauldron was to be mounted with no single officer in command. Instead, there were these independent units involved, but operating on their own. The plan sounds like another typical 8th Army operations, with the forces sent off in all directions, acting alone. The 10th Indian Brigade would attack to the west. The 32nd Army Tank Brigade would attack south and take the Sidra Ridge. Following those movements, timed to happen sequentially, the 7th Armoured Division and 9th Indian Brigade would attack west into the Cauldron. Why could they have not been more concentrated and moved together? This was all to commence on 5 June 1942. This is based on the account in Vol.III of the Official History.

Saturday, March 21, 2009

Auchinleck's plan

By 2 June 1942, General Auchinleck wanted to mount an attack towards Bir el Temrad from the XIII Corps front. He was the only one in favor of such a move, as it was opposed by General Ritchie and his corps commanders. He had also thought about a turning movement around the southern end of the front, but gave it up in face of opposition and the questions about their ability to keep the attack supplied. He then decided that they would attack the Axis forces in the vicinity of "The Cauldron". The attack would be mounted on 5 June and would start with the 10th Indian Brigade and the with 4th RTR support easily took their objective. The other moves also went well, but that was because the Axis forces were further to the west than the plan had foreseen. The result was that the result was very bad. This is based on the account in Vol.III of the Official History.

Thursday, March 19, 2009

Other moves on 2 June 1942

Rommel tried to distract the British from Bir Hacheim by sending the 21st Panzer Division on a feint towards Eluet et Tamar on 2 June 1942. They encountered the 5th RTR and destroyed 12 of their tanks. The 5th RTR was one of the regiments in the 4th Armoured Brigade. That was the only major movement for a few days while both sides were working on recovering and repairing tanks and reorganizing for the next phase of the battle. The DAK had been reduced to just 130 runners from the total of about 320 tanks that they had at the start of the battle. This is based on the account in Vol.III of the Official History.

Friday, March 13, 2009

The fight for Bir Hacheim, starting 2 June 1942

The Germans and Italian forces moved on Bir Hacheim next. 2 June 1942 was a day of sand storms. On 3 June, the German air force started bombing Bir Hacheim. For their part, the RAF hit the easy targets presented by the concentrated German and Italian units moving on Bir Hacheim. The RAF shot down 16 German and Italian aircraft at the cost of 13 lost. The Free French forces were heartened by the strong air support.


British and Commonwealth ground forces were active, but mostly with Jock columns operating on the German supply lines that cut through the minefields at Trigh Capuzzo and the Trigh el Abd. Columns were drawn from the 1st South African Division, the 50th Division, and the 7th Motor Brigade. The one brigade-size attack was made by the 1st South African Brigade against the Trento Division. This is based on the account in Vol.III of the Official History.

Friday, March 06, 2009

Bir Hacheim


Rommel was in a somewhat more secure position by 2 June 1942. After taking the Sidi Muftah area, he intended to attack Bir Hacheim with some of his better infantry: the 90th Light Division and the Italian Trieste Division (motorized). The Official History notes that by this phase of the battle, Rommel had lost General Gause and Colonel Westphal to wounds.


Since 30 May, the British had been very active in the air, but by 2 June, they had taken many losses and had to stop low level attacks on Axis ground forces due to the dwindling stocks of Kittyhawks. The British had lost 50 aircraft in the first 5 days of the battle. The only good sign was the arrival of the first Spitfires in the fighter role. The plan was to use them to fly high cover for Hurricanes used as fighter-bombers. This is based on the account in Vol.III of the Official History.

Amazon Ad